Monthly Archives: February 2015

fabric yarn basket

Blue Basket With Flowers and Trim

Since my first two little baskets, I have crocheted so many baskets with fabric yarn, and un-crocheted even more!  Wait, that doesn’t make sense… But that’s how it seems.  Fabric yarn is so quick and easy to unravel, that whenever I don’t like the outcome I just pull and undo it, and remake it a little better… Or maybe change the type and color of the trim.
But if I get past the immediate urge to unravel the imperfect, or if by chance it comes out perfect, I place the finished basket somewhere ‘just for now’, and something strange begins to happen… The fabric yarn I just finished crocheting sends off little rootlets into the table or the shelf… The roots grow into the surface, deepening their hold (they do this especially at night), and when I want to move the basket, I discover it’s too late, it’s impossible to detach it from where it has been standing.
There is only one way to get around this (that I know of), and that is, when you crochet the basket for someone special. There will be a lot of unraveling and redoing, but when it’s finished, the roots will wait to grow until they reach that person’s house.
So now, it’s just a matter of finding the right flowers to go with the basket.2014-2-canon 167
I have had two opportunities to make such a basket for two special someones, and it was such a nice feeling to see them growing roots in their new home. Well, I didn’t try to lift them from their place but I assume it’s the same on any surface.
IMG_20140802_172537095This picture was taken by my niece N. (we were running a little low on daylight, but I think the lighting gives it atmosphere…).

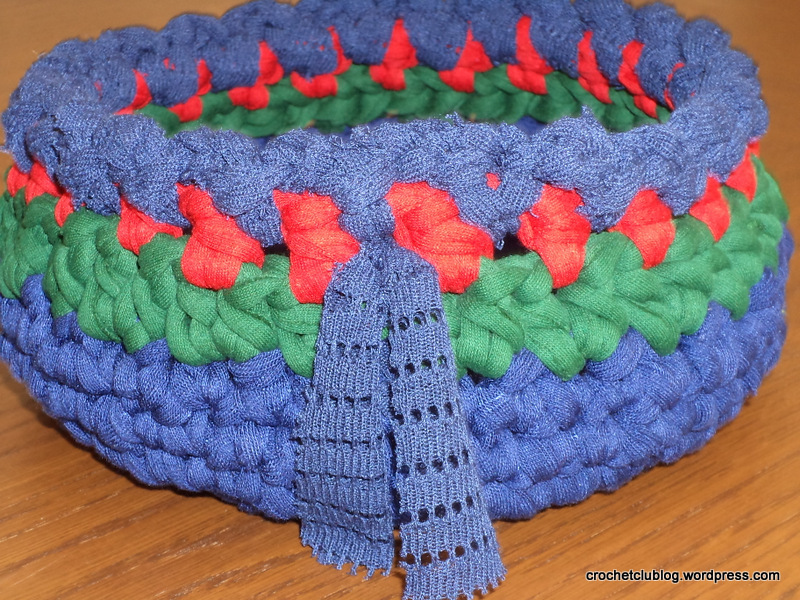
These two baskets (they are two different ones, although they look the same…) were made by single-crocheting blue fabric yarn in a spiral for the base, then continuing straight on for the sides. Once you have a low-rimmed blue bowl, you finish it off, and start to crochet the flower rows. My green and red strands were slightly thinner than the blue, so I think I may have used a slightly smaller hook. This serves well for the rounding in of the basket. You start with the stems in green: Two half double-crochets in a stitch, then skip one (you need to have an even number of stitches, which you will if you start the base with an even number of single crochets into the magic circle). For the next row, you crochet a red half double crochet into a pair of green hdc’s, right between the stems – then chain stitch, and so on all around. For the trim, you use a lacy strand of fabric yarn. You start by slip-stitching the strand to the space between two red hdc’s, then chain-stitching (I think 4 ch st), and slip-stitching again in the next space, and so on all around.
2014-2-canon 160
If you start with a tail to the thread and end with one, you can pull those tails through to the outside of the basket to make a bow, or just tie in a loose knot and let the strands hang down so their laciness shows.
2014-2-canon 161
If you put a flowerpot in the basket, be sure to use a base for it, and if you want cut flowers or a little flower arrangement, make sure it’s in a bowl!

Advertisement
fabric yarn rug

Growth Ring Rug

At last, my first! This was my first ever fabric yarn project. Previously on this blog, I wrote about the first project I completed, which you will note is not the same thing. The pair of little baskets were begun and finished in an afternoon, even as the rug I was working on was slowly growing its rings.  It all began with The Shirt.  It was (note the past tense…) soft checked 100% cotton flannel in shades of turquoise and brown. It was handed down and handed over several times, spanning cousins and continents, and worn to a very worn state. It was so soft and comfortable because the fabric had, over time, turned from cotton to silk (yes, that can happen with enough laundering and wear), and in some places, it was so nearly-frayed that a gentle breeze could cause it to rip.
How can anyone possibly say goodbye to a shirt like that? Impossible.  So one day, when yet another little rip overturned the balance between intact and torn threads in favor of the latter, it was time to give it its new form.
With a certain vision as to how a rag rug is made, I took my big scissors and started cutting the shirt into strips. I cut everything: Front, back, stitches, collar, cuffs. Not a check of the checked fabric was left out. I realized at some point that the buttons were probably out of the game, but everything else was cut, piled and joined to form a nice, long, faded, fuzzy, soft, cotton-silk turquoise and brown strand.
I had a big crochet hook I had used as a teenager to make really quick shawls out of regular yarn. For many years I thought that’s what this jumbo hook was for – emergency gifts – until I realized the true purpose of this timeless tool.
I have many a crocheted spiral in my résumé, but it was weird – and fun – and funny – to be crocheting a torn up shirt. The strand of joined yarn was a little uncooperative at times – especially when I got to the cuff and collar parts – but I finally managed to get it all under my hook. And before long – in fact, quite sooner than I expected – the strand was all gone, and the “rug” was a little over the size of a dinner plate. This, from a shirt that had crossed continents and generations and withstood not only gentle breezes but many a northern gale: A tiny, scrunched up dinner-plate of a ruglet with some cuff and collar sizing sticking out here and there.
But there was no going back – a shirt, it could no longer be (and really hadn’t been for quite a while, in the usual sense of the word). As I could not go back I thought I’d move on and find some more Old Shirts to add to the rug.
Old clothes are not that hard to come by in our house, due to my tendency to move them to The Back of the Closet rather than Out of the House. I found two very soft and comfortable stretchy tops that had seen better times, and an old black cotton t-shirt – well, ex-black, now faded charcoal, to be precise.  All three garments were retrieved from the depths of the closet and promptly cut and joined to form 3 colored strands.
Unspoiled as I was at the time by Facebook groups, blogs, patterns and other showcases of the Current Conventions of the art of fabric yarn, I had no qualms about crocheting each strand as it went, until it ran out, the traditional way. But instead of starting a new color in the middle of a row, towards the end of each strand I switched from single crochet (American term) to slip stitching, sloping along the round gradually to close it into a circular form. The result was four not-too-concentric circles that look like – well, puddles, or lakes, or, as I finally decided, the growth rings of some mysterious tree.
Growth rings in a 55 year old pine slice

Crochet Rag Rug Ok, I know how to crochet perfect circles, or a spiral as I choose. But it was my choice to use up every single itty-bitty strand from these much-worn, much-faded, faithful clothes with so many a story to tell, and it felt like these circlish forms would best tell their story.
But even these soon ran out… And so I made my way to actually buying pre-cut strands – what a funny thought, for someone to purposely create rags! But there was no going back… My hook was poised and the rug was waiting. The bought strands joined the historic ones, completing the organic woodsy color scheme and also the very free-flowing stitch choice and style.
Crochet Rag Rug
The rug has found its place in the bedroom, far from the scrutiny of strangers who might choose to enlighten me on the basics of Euclidean geometry, but viewed daily by those who understand the true meaning of every growth ring. Sometimes when I open my eyes in the morning I can swear it’s started growing another ring overnight – could this be possible?

Crochet Rag Rug