Author Archives: The Basket Fairy

About The Basket Fairy

You are welcome to visit my blog, The Basket Fairy - Explorations With Fabric Yarn and Crochet (previously "Crochet Club").

Fabric Crochet Basket Textile yarn t-shirt yarn plarn trapillo

It’s Not Me, It’s the Basket Fairy!

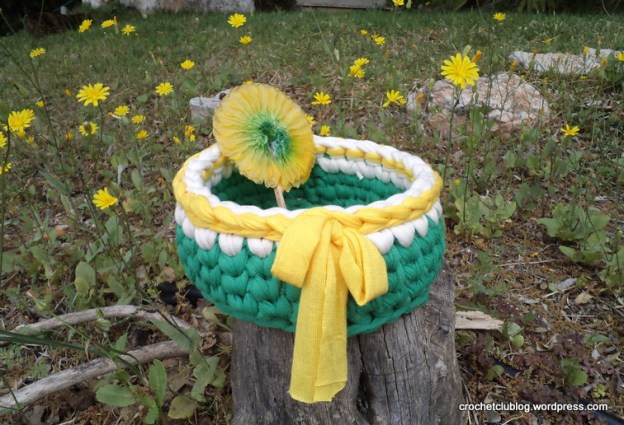
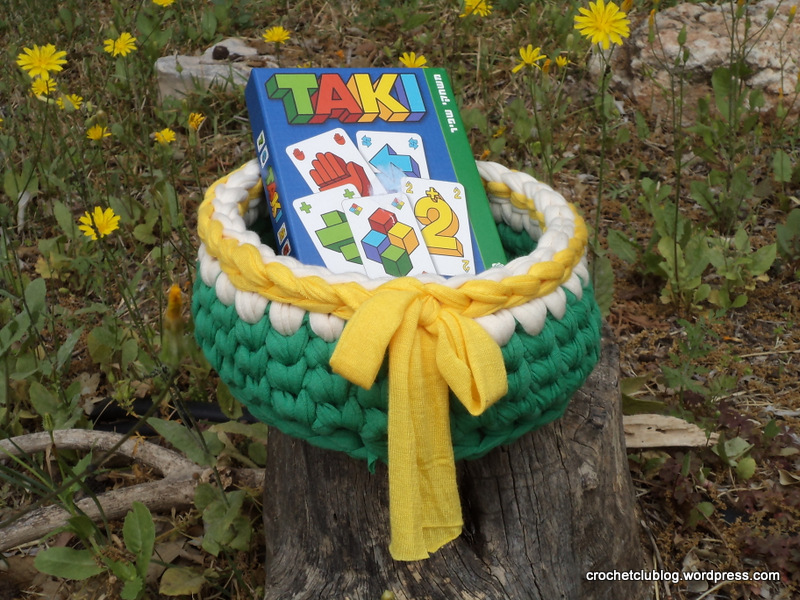
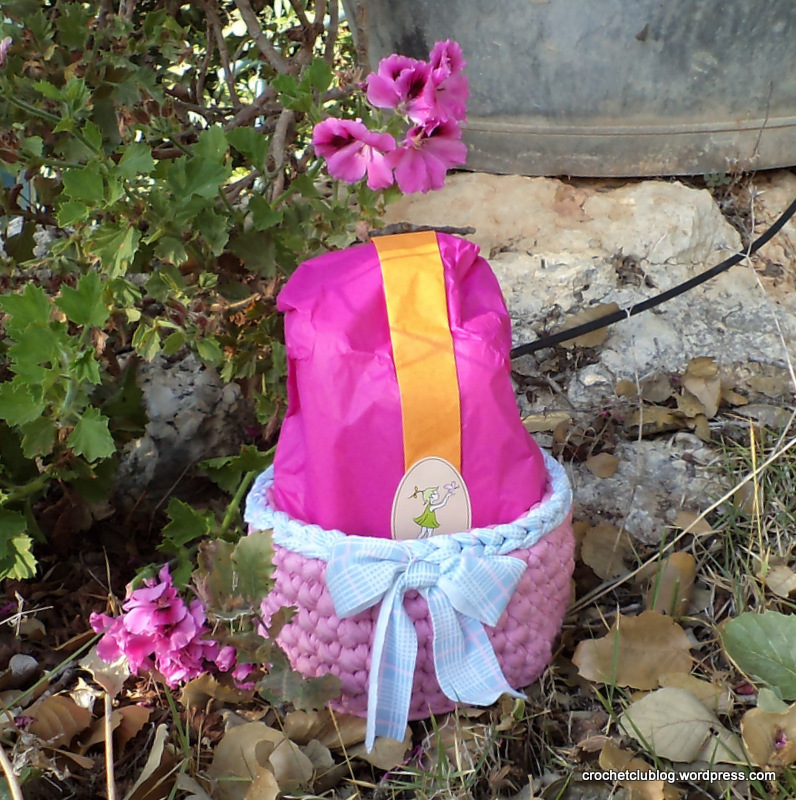
Yes, I know I’ve already made lots of baskets, even one or two pretty much like this one, but can I help it if I go out to the garden and find a cute pink basket just sitting in the geraniums waiting to be picked up? And can I help it if it’s just the right size for the baby gift I wanted to give my friends, and it even complements it in color? And can I help it if the baby who got it just loved it?
It’s the Basket Fairy, hovering over, finding the right moment to leave a soft, squeezable, colorful little gift where I least expect it. What would you do?

Fabric Crochet Basket Fabric Crochet BasketFabric Crochet Basket

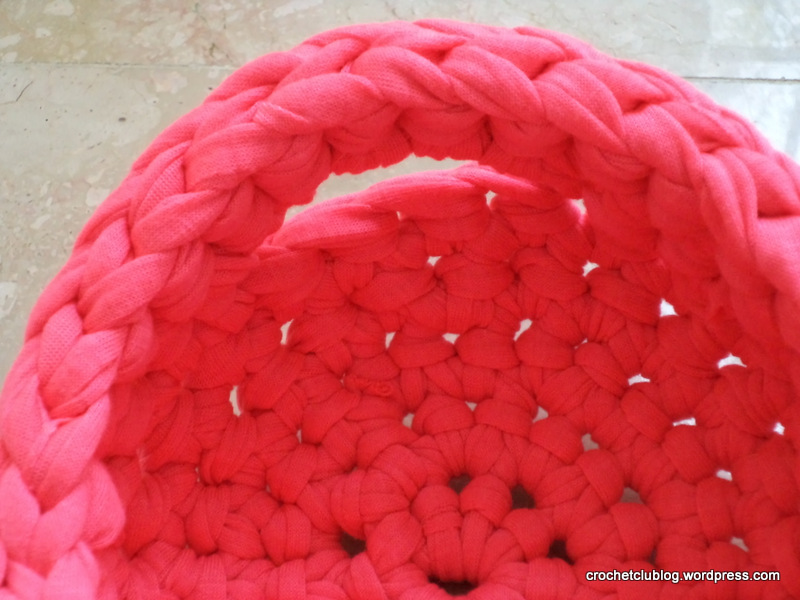
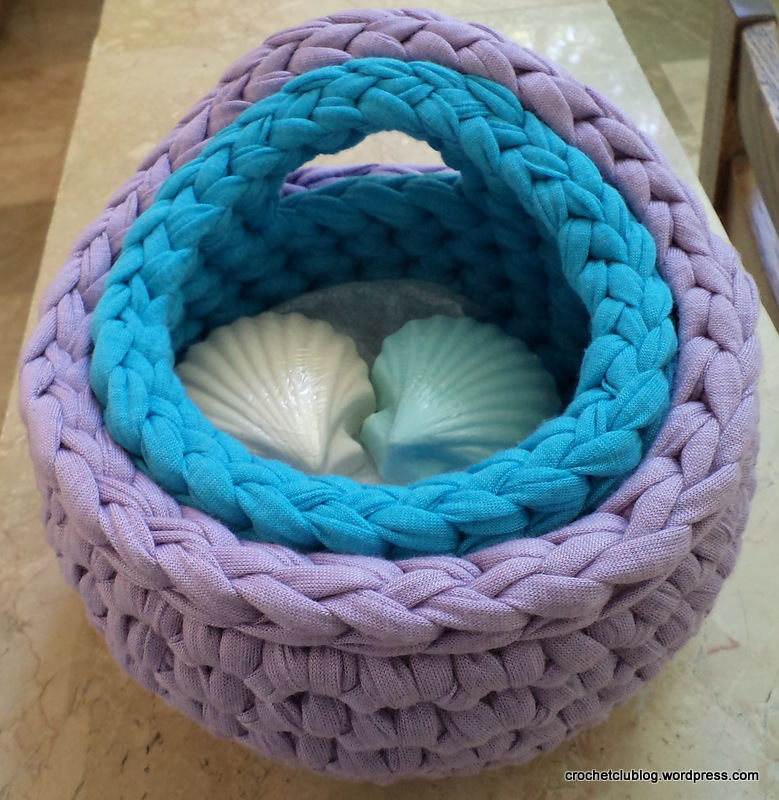
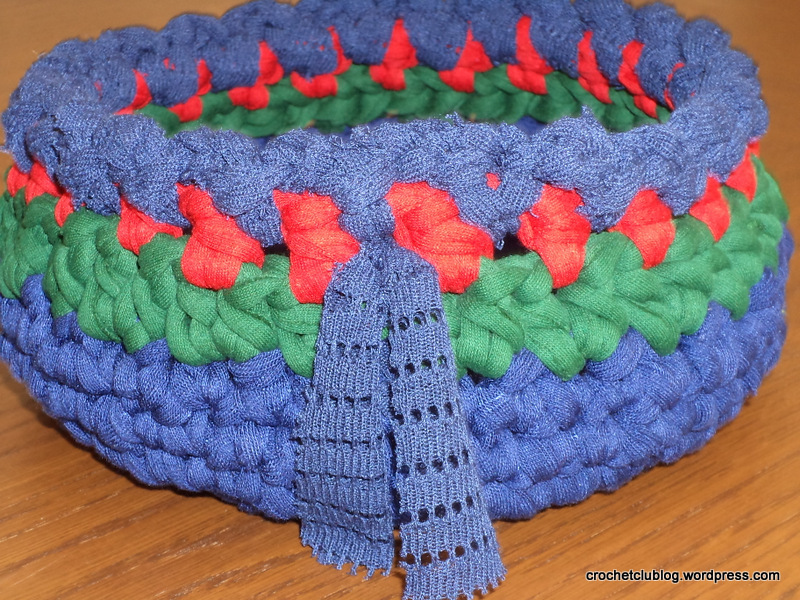
How I Made the Basket: The same way as always… A size 12 hook and medium-wide, slightly stretchy, but not too stretchy, fabric yarn. Start with a magic circle and crochet a spiral base (or just a round base) in yarn under single crochet. Finish off with an invisible join. Start row 1 anywhere, crocheting into back loops only in YUSC. At the end of row 1, slip stitch into first stitch, chain 1, and continue stitching the next rows the same way. When you have reached the desired height, finish off with an invisible join. To make the trim, I used a complementary strand of fabric yarn. Place the basket facing you so that the part where you made the slip stitches to finish off the rows is in the far back. Now insert the hook into the back loop of the stitch in the middle of the top row (facing you ) to make a slip stitch, leaving a generous tail for the bow later on. Slip stitch into every stitch thereafter, into back loop only, till you have reached the stitch before the one you drew the strand from. Finish off with an invisible join. Cut the strand, leaving a tail the same length as the first one. You now have 2 tails on the inside of the basket. Draw each of the tails to the outside of the basket, using the spaces between double crochet stitches of the last row of the basket, with one dc stitch between them, and tie them in a bow.

Advertisement
amigurumi bear cotton thread crochet

Blue Bear

This is my first Amigurumi project.
I used crochet instructions by Sharon Ojala
And cotton thread
And fabric yarn scraps for the filling
And sewed-on felt for the eyes
And embroidered yarn for the nose and mouth
With lots and lots of trials till I got the right expression
And fabric yarn for the scarf
And something that I will not talk about here
But if you’ve ever made a bear
I know you’ll understand.
amigurumi bear cotton thread crochet

Save

Save

crochet fabric yarn rug

Candy Carpet and Blogiversary

It seems appropriate at the close of a year to come full circle to one of my first fab-yarn (my term for fabric yarn) projects. Fortunately I took the pictures some time ago, because by now it has already undergone some wear! But before I tell you about it, I want to go back to August, 2014, when I first started writing here…
I was crocheting incessantly at the time because it was all I could do in face of a raging war where I live. I was hanging on to the threads of fabric yarn for balance, and they became threads of hope and prayer to me. Not much in the way of combating evil but on a personal level, it was panacea.
That round of hostility is over, but it seems as if the ongoing conflict has splintered into anger and cruelty and hatred. Summer, with its crazy heat and humidity, has apparently instigated flames in sad and frightening ways.
I have learned that stitching gives me some inner peace in times of turmoil, whether regional or very personal. I thank you for joining me in this peaceful abode, and welcome your company in the Pursuit of Simple Joys.

Crochet rag rug

So this is the rug, titled Candy Carpet for the candy-cane striped strand midway, and the general crazy color scheme. It was a by-product of my First Project, because the same day I raided my closet for old t-shirts and tights, I realized that not all old clothes necessarily go well with each other. The pink-red-purple-turquoise pattern of the old tights in the middle simply did not blend well with the brown-green checks of the old flannel shirt.

Crochet Rag Rug
And so my first rug became two rugs – I started them both alongside, then went to the fab-yarn shop and bought what I needed to match each of them. Having started with crazy colors I went along, and this was also a chance to feature one of my favorite ever strands – see the red floral cotton between the pink and the gray? This home cut strand, originally a curtain hem, was a gift from my MIL who was glad to donate her stash in support of my newfound creative endeavor.  I think we’re giving “vintage” a new meaning here.

Crochet rag rug
Like my first first-rug, this project was done in happy obliviousness of rules and conventions. All I knew was “intuitive” crocheting, as in, adding enough stitches to make it settle nice and flat. I think it worked for the most part, and when it didn’t, I un-crocheted it, and tried and erred till I was happy with the result. The same with the colors and pattern – I stitched around, then unraveled it if I didn’t like it… So in all, if I had crocheted forward and not back-and-forth, this rug could probably cover our living room floor. But as it is, it’s just right for a visiting toddler to settle on – and enjoy the legos that have been sitting around since my kids were resident toddlers.

Crochet Rag Rug
You may notice the center is a bit off-center. Like my other first carpet, I kept to the rule of – not a scrap of old scraps is to be thrown away, so I stitched until the strand ended, which was not always at the end of a row. But since the fabric pattern was so wild anyway, I just let it be, and put a little peace and order in by encircling the middle enclave in purple and gold. Some additional containment I think was obtained with the off-white border. I also think it gives it kind of an ethnic-carpet style, don’t you?
I can tell you it’s soft and comfortable to sit on, and that is the one nice thing about making rugs out of well-worn, thread-thin 20 year old cotton tights…

Crochet Fabric Yarn Basket for Cat Textile yarn basket t-shirt yarn plarn trapillo

A Basket for Louis

Louis needed a basket to snuggle in. His people mentioned something about it rather inadvertently (I thought I heard the word “cat”, or maybe it was “bat”? And there was something about “basket”, but it might have been “brisket”, I’m not sure). At any rate, when I offered to make Louis a basket of his very own, they didn’t object. Well, not very insistently. I knew of course they were only being polite so as not to trouble me and so I assured them I’d be delighted to make it.
I asked them what color they wanted it to be (I am so very careful not to impose my designs on my friends’ décor). They said maybe dark red. Fortunately I had some, and I thought it would go well with the gray.
Louis’s people liked the basket, and I hope Louis will too (Right now it’s high summer so Louis spends most of his time outside, stalking frogs and such). If you want to know how I made the basket, please scroll down.
The cat in the pictures is not Louis, but our cat, who always joins me whenever I’m taking pictures of my projects in the garden. In this case she seemed especially interested, and in the end I could see why. I had to re-tie the bow a few times but now it’s back to it’s original elegant form.
(For updates on Louis and his basket, and a rather regal surprise, see The Prince and the Not-Exactly-Pauper.)
Louis 5bLouis 8Louis 9Louis 3

How I made the basket: I asked Louis’s people what size they thought it should be. They measured the newspaper basket he usually settles in and said, 30cm X 40cm. Since I wanted to make an oval, I subtracted the width from the length (40 – 30 = 10) and that gives you the length of the starting chain.

Make a starting chain of 10cm (I used a size 12 hook), ch 1, then sc into the 2nd st next to the one on on your hook, and into every one after but the last.

When you reach the end stitch, make 3 sc into it. Continue with sc into each st on the other side. When you reach the end stitch, sc 2 into it, which will join the one sc you made at the start.

Continue with sc in a spiral, always adding 3 sc on the round part of each side every time you crochet along it, the same way you pick up your salary whenever you pass ‘start’ in Monopoly.

When your width is 30 cm, your length should be 40 cm.  Stop adding, and make a row of 1 sc all around. Finish it off with an invisible join and cut.  Start a new thread for the next row (mine was red), crocheting with woven stitch around the base (crochet from the outside, with the right side of the base facing upwards), and close the row with 1 sl st and 1 ch st. Continue upwards with woven stitch, closing each row with sl st and 1 ch st. Notice you are no longer crocheting in the spiral but closing with a sl st  and ch 1’ing at the end of each row.

When you reach the desired height, finish off the last row with an invisible join and cut.

Make the trim using sl st into back loops only of top row of sides, finishing off with an invisible join. Leave a tail at the beginning and end of the trim (mine was gray as you can see).

Draw the tails outside, and cut a separate piece of red strand.  Try and simulate tying a bow before it’s cut so you know how long to cut it. Now place the cut strand on the inside of the basket where the gray tails were, draw out the tails of the red strand, and tie a pretty bow on the outside.  Snip the ends to match the length of the gray tails. I tied a single knot at the ends of the gray tails because it made them hang down a little better, so if you want to do that, tie first before matching the length of the red.

Crochet fabric yarn basket

Peach and Purple

But actually, neat and sturdy stitches aren’t limited to Baskets for Guys. I had fun making these for the lovely young ladies, splurging in peachy orange, sparkly purple and pink-striped trim. I’m sounding bold but all along there was that nagging hesitation too – will the baskets fit the color scheme of their destined surroundings? Will they suit the receivers’ individual tastes, which I so admire and respect?
But if we went along with thoughts like that, there’d be no give and take, would there, to use Eeyore’s terms. And thinking of that, weren’t Pooh and Piglet a little hesitant about their own gifts too, and wasn’t Eeyore so very pleased to get them nonetheless?
And does a flower ask itself every day if its colors are just right, and if its petals are facing the exact right direction?

Bird of Paradise
So, I guess all we can do is pick up our magic wand and crochet that pumpkin – or lilac – and send them on their way!

Crochet Fabric Yarn BasketBird of ParadiseCrochet Fabric Yarn BasketCrochet Fabric Yarn Basket

The baskets are posing here with a little something in them, and in real life, there were other little somethings inside.
No problem with ribbons this time!

Crochet Fabric Yarn Basket

How I made the baskets:
Using a size 12 hook and fabric yarn, I made a round spiral base in SC. I worked the sides in yarn under single crochet, working into the back loops only of the base. I made the trim in crab stitch, or reverse single crochet. I left a tail at the beginning and end of the trim, and used it to tie the bow. That’s it!

Save

Crochet Fabric Yarn Baskets

The Gift of Baskets

In our family, guys get baskets too. I’ll have to say they were sweet about it, though! And I for my part did my best to meet the design challenge: I made a round base and finished it off, then started working the sides into the back loops of the last row of the base. Both the base and the sides were done using yarn under single crochet. What is that, you ask? Oh! (Shrugging nonchalantly…), only the coolest and most useful stitch that I’ve just recently discovered… It’s a good stitch for when you want a neat and sturdy style.  Did I mention I was making these for the guys? Crochet Fabric Yarn BasketCrochet Fabric Yarn Basket The trim was made with a complementary color, in good old-fashioned single crochet.  No ribbons and bows this time… Crochet Fabric Yarn BasketCrochet Fabric Yarn Basket The fruit is for the picture. In reality there were other things inside, and the guys, being sweet, pretended along with me that they didn’t know whatever was in them, no matter how carefully chosen and well meant, was just an excuse to give them one of my very own creations 🙂 Crochet Fabric Yarn Baskets

Crochet Fabric Yarn Basket

Spring Basket

It’s still spring in Basketland – Look what sprouted in my garden!Crochet Fabric Yarn Basket

After more spiral-crochet baskets than I can count, occupying a total area which far exceeds the sum total of surface areas in my house AND all my friends’ and relatives’ houses combined, I’ve decided it’s time to switch to… A new type of basket! My research on more sturdy sides, allowing for a slightly less roundish and more cylindrical shape, led me to the waistcoat stitch. The stitch, despite its anything-but-botanical name, actually yields a lush leaf-like texture, which totally looks like something growing from the spiral base . And so it is fitting that it should have a daisy-ish trim. I made the trim with a combination of single crochet (the white) and slip stitch (the yellow).crochet fabric yarn basket

And of course, the bow.Crochet Fabric Yarn Basket

Crochet Fabric Yarn Nesting Baskets

Baby Nesting Baskets

I chose this design for a cute little round basket with a single handle. I bought lots of balls of fabric yarn in bright colors to choose from. And while I was experimenting with the design, some came out a little bigger and some a little smaller, depending on which type of strand I used. Where I buy fabric yarn, the strands are each different, because they are made from textile factory leftovers.  I think that counts as a certain level of recycling!
Anyway, I noticed that the smaller ones fit very nicely into the bigger ones – and I had fun mixing and matching them into these duos.
Two lone but determined wildflowers springing up from the lawn were in full agreement with the little baskets: It’s definitely spring.

5-2014-2-canon 1453-2014-2-canon 148 4-2014-2-canon 1448-2014-2-canon 152-0031-2014-2-canon 142 2-2014-2-canon 1841-2014-2-canon 1863-2014-2-canon 1835-2014-2-canon 181

fabric yarn basket

Blue Basket With Flowers and Trim

Since my first two little baskets, I have crocheted so many baskets with fabric yarn, and un-crocheted even more!  Wait, that doesn’t make sense… But that’s how it seems.  Fabric yarn is so quick and easy to unravel, that whenever I don’t like the outcome I just pull and undo it, and remake it a little better… Or maybe change the type and color of the trim.
But if I get past the immediate urge to unravel the imperfect, or if by chance it comes out perfect, I place the finished basket somewhere ‘just for now’, and something strange begins to happen… The fabric yarn I just finished crocheting sends off little rootlets into the table or the shelf… The roots grow into the surface, deepening their hold (they do this especially at night), and when I want to move the basket, I discover it’s too late, it’s impossible to detach it from where it has been standing.
There is only one way to get around this (that I know of), and that is, when you crochet the basket for someone special. There will be a lot of unraveling and redoing, but when it’s finished, the roots will wait to grow until they reach that person’s house.
So now, it’s just a matter of finding the right flowers to go with the basket.2014-2-canon 167
I have had two opportunities to make such a basket for two special someones, and it was such a nice feeling to see them growing roots in their new home. Well, I didn’t try to lift them from their place but I assume it’s the same on any surface.
IMG_20140802_172537095This picture was taken by my niece N. (we were running a little low on daylight, but I think the lighting gives it atmosphere…).

These two baskets (they are two different ones, although they look the same…) were made by single-crocheting blue fabric yarn in a spiral for the base, then continuing straight on for the sides. Once you have a low-rimmed blue bowl, you finish it off, and start to crochet the flower rows. My green and red strands were slightly thinner than the blue, so I think I may have used a slightly smaller hook. This serves well for the rounding in of the basket. You start with the stems in green: Two half double-crochets in a stitch, then skip one (you need to have an even number of stitches, which you will if you start the base with an even number of single crochets into the magic circle). For the next row, you crochet a red half double crochet into a pair of green hdc’s, right between the stems – then chain stitch, and so on all around. For the trim, you use a lacy strand of fabric yarn. You start by slip-stitching the strand to the space between two red hdc’s, then chain-stitching (I think 4 ch st), and slip-stitching again in the next space, and so on all around.
2014-2-canon 160
If you start with a tail to the thread and end with one, you can pull those tails through to the outside of the basket to make a bow, or just tie in a loose knot and let the strands hang down so their laciness shows.
2014-2-canon 161
If you put a flowerpot in the basket, be sure to use a base for it, and if you want cut flowers or a little flower arrangement, make sure it’s in a bowl!

fabric yarn rug

Growth Ring Rug

At last, my first! This was my first ever fabric yarn project. Previously on this blog, I wrote about the first project I completed, which you will note is not the same thing. The pair of little baskets were begun and finished in an afternoon, even as the rug I was working on was slowly growing its rings.  It all began with The Shirt.  It was (note the past tense…) soft checked 100% cotton flannel in shades of turquoise and brown. It was handed down and handed over several times, spanning cousins and continents, and worn to a very worn state. It was so soft and comfortable because the fabric had, over time, turned from cotton to silk (yes, that can happen with enough laundering and wear), and in some places, it was so nearly-frayed that a gentle breeze could cause it to rip.
How can anyone possibly say goodbye to a shirt like that? Impossible.  So one day, when yet another little rip overturned the balance between intact and torn threads in favor of the latter, it was time to give it its new form.
With a certain vision as to how a rag rug is made, I took my big scissors and started cutting the shirt into strips. I cut everything: Front, back, stitches, collar, cuffs. Not a check of the checked fabric was left out. I realized at some point that the buttons were probably out of the game, but everything else was cut, piled and joined to form a nice, long, faded, fuzzy, soft, cotton-silk turquoise and brown strand.
I had a big crochet hook I had used as a teenager to make really quick shawls out of regular yarn. For many years I thought that’s what this jumbo hook was for – emergency gifts – until I realized the true purpose of this timeless tool.
I have many a crocheted spiral in my résumé, but it was weird – and fun – and funny – to be crocheting a torn up shirt. The strand of joined yarn was a little uncooperative at times – especially when I got to the cuff and collar parts – but I finally managed to get it all under my hook. And before long – in fact, quite sooner than I expected – the strand was all gone, and the “rug” was a little over the size of a dinner plate. This, from a shirt that had crossed continents and generations and withstood not only gentle breezes but many a northern gale: A tiny, scrunched up dinner-plate of a ruglet with some cuff and collar sizing sticking out here and there.
But there was no going back – a shirt, it could no longer be (and really hadn’t been for quite a while, in the usual sense of the word). As I could not go back I thought I’d move on and find some more Old Shirts to add to the rug.
Old clothes are not that hard to come by in our house, due to my tendency to move them to The Back of the Closet rather than Out of the House. I found two very soft and comfortable stretchy tops that had seen better times, and an old black cotton t-shirt – well, ex-black, now faded charcoal, to be precise.  All three garments were retrieved from the depths of the closet and promptly cut and joined to form 3 colored strands.
Unspoiled as I was at the time by Facebook groups, blogs, patterns and other showcases of the Current Conventions of the art of fabric yarn, I had no qualms about crocheting each strand as it went, until it ran out, the traditional way. But instead of starting a new color in the middle of a row, towards the end of each strand I switched from single crochet (American term) to slip stitching, sloping along the round gradually to close it into a circular form. The result was four not-too-concentric circles that look like – well, puddles, or lakes, or, as I finally decided, the growth rings of some mysterious tree.
Growth rings in a 55 year old pine slice

Crochet Rag Rug Ok, I know how to crochet perfect circles, or a spiral as I choose. But it was my choice to use up every single itty-bitty strand from these much-worn, much-faded, faithful clothes with so many a story to tell, and it felt like these circlish forms would best tell their story.
But even these soon ran out… And so I made my way to actually buying pre-cut strands – what a funny thought, for someone to purposely create rags! But there was no going back… My hook was poised and the rug was waiting. The bought strands joined the historic ones, completing the organic woodsy color scheme and also the very free-flowing stitch choice and style.
Crochet Rag Rug
The rug has found its place in the bedroom, far from the scrutiny of strangers who might choose to enlighten me on the basics of Euclidean geometry, but viewed daily by those who understand the true meaning of every growth ring. Sometimes when I open my eyes in the morning I can swear it’s started growing another ring overnight – could this be possible?

Crochet Rag Rug