Tag Archives: crocheting in a spiral

Recycled t-shirt yarn trivet

From T-Shirt to Trivet

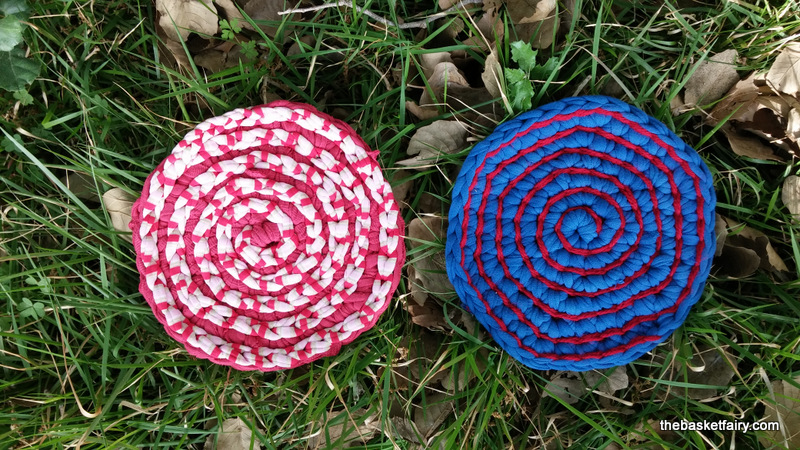
These colorful trivets were made from recycled t-shirts!
The method is simple.
But first, you need to know how to cut a t-shirt into fabric yarn. This is a good  tutorial.
One t-shirt is about enough for one trivet.

Recycled t-shirt yarn trivet

Recycled t-shirt yarn trivet

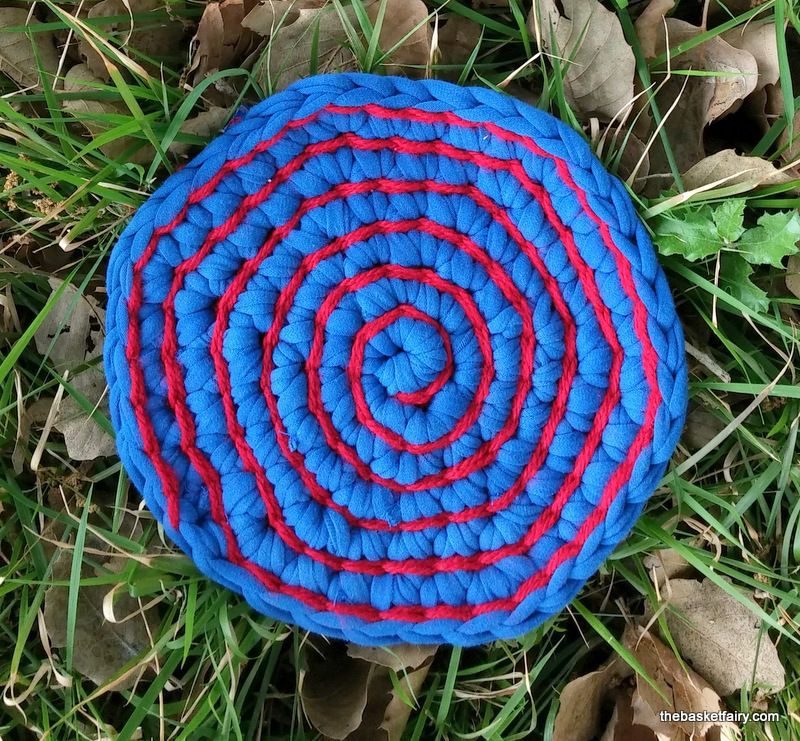
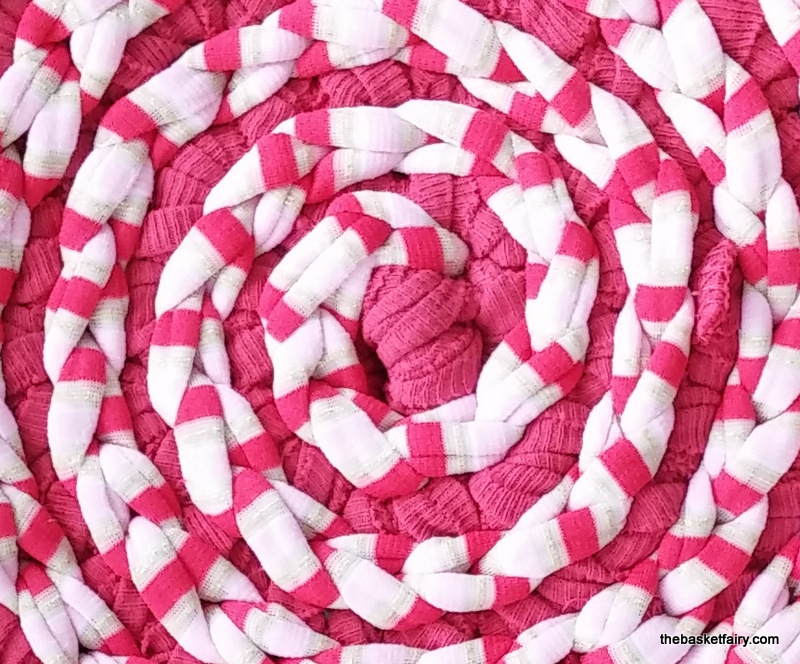
For the trim, use a different colored strand of anything (of course, left-over bits are great) – I used one strand of striped ready-made fabric yarn for the red-and-white trim, and ordinary yarn for embellishing the blue trivet with red.

Recycled t-shirt yarn trivet

Just one thing: You don’t want delicate fabrics or yarns for this. Remember, you’re going to set a hot pot base on it, so make sure it doesn’t melt away your trivet!
Fabric with a high content of cotton is good – and yarn with some cotton or natural wool content should work well. I admit I haven’t tested other types, but I’m not sure I’d want to try…

Now, here’s for my very secret, very complicated fancy pattern!

Using a no. 12 crochet hook, make a magic ring.
Row 1: Crochet 6 sc into ring.
Row 2: Working in a spiral, continue and crochet 2 sc into each st (12).
Do you know what working in a spiral means? It means you do not close off each round with a sl st, but instead, go right ahead and crochet the first 2 sc of the next round into the first st of the previous round. Do this at the end/beginning of each and every row. Place a stitch marker after the last st of every row to mark the beginning of a new row.
Row 3: *2 sc into 1st st, 1 sc into next st*, repeat 6 times. (18)
Row 4: *2 sc into 1st st, 1 sc into each of 2 following sts* repeat 6 times (24)
Row 5: *2 xc into 1st st, 1 sc into each of 3 following sts* repeat 6 times (30).
Finish off with an invisible join and weave in the ends.

Note: If you run out of t-shirt yarn in the middle of the last row, you can finish off right where you are.  Or, if you have enough for more than the number of rows in the pattern (or for that matter, less), you can just continue crocheting until the end of the strand.

If you want to insist on (almost) perfect roundness – go ahead and finish off at the end of a row. However, the spiral technique skews the circle a little anyway (if you take a close look you’ll see what I mean). So when you’ve finished, take a look and see if the shape you’ve obtained is the one you want, or continue a little if you wish until it looks just right to you, as long as the strand lasts.

Now for the trim:
Start with a sl st at the top of the second sc you made, in the space between the rows.  That will start you very near the center of the spiral. Continue with sl st in the space between the rows, one sl st for each sc in the row below it.  Draw out the sl st’s as much as you need so that your project lays flat, because the strand you use may not be identical to the one you used to crochet the base. You will be stitching in a continous spiral between the rows.

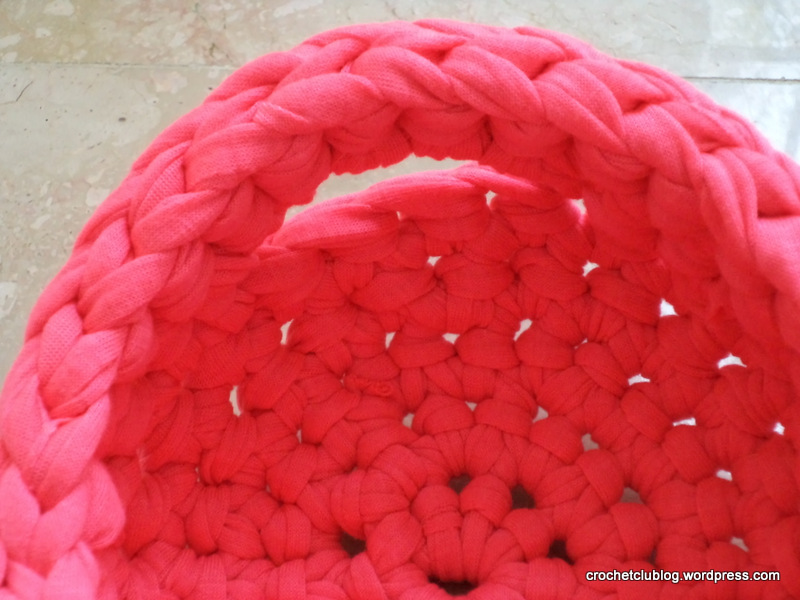
If you use a fabric yarn strand, the sl st spiral may almost cover the original crocheted spiral (as in the red-and-pink trivet)

Recycled t-shirt yarn trivet

If you use a thinner strand, such as yarn, it will accent it between the rows (as in the blue and red trivet).

Recycled t-shirt yarn trivet

When you reach the end of the spiral, draw out the strand, move it to the back, and weave in the end.

Done!


Save

Advertisement
Crochet Fabric Yarn Basket

Spring Basket

It’s still spring in Basketland – Look what sprouted in my garden!Crochet Fabric Yarn Basket

After more spiral-crochet baskets than I can count, occupying a total area which far exceeds the sum total of surface areas in my house AND all my friends’ and relatives’ houses combined, I’ve decided it’s time to switch to… A new type of basket! My research on more sturdy sides, allowing for a slightly less roundish and more cylindrical shape, led me to the waistcoat stitch. The stitch, despite its anything-but-botanical name, actually yields a lush leaf-like texture, which totally looks like something growing from the spiral base . And so it is fitting that it should have a daisy-ish trim. I made the trim with a combination of single crochet (the white) and slip stitch (the yellow).crochet fabric yarn basket

And of course, the bow.Crochet Fabric Yarn Basket

Crochet Fabric Yarn Nesting Baskets

Baby Nesting Baskets

I chose this design for a cute little round basket with a single handle. I bought lots of balls of fabric yarn in bright colors to choose from. And while I was experimenting with the design, some came out a little bigger and some a little smaller, depending on which type of strand I used. Where I buy fabric yarn, the strands are each different, because they are made from textile factory leftovers.  I think that counts as a certain level of recycling!
Anyway, I noticed that the smaller ones fit very nicely into the bigger ones – and I had fun mixing and matching them into these duos.
Two lone but determined wildflowers springing up from the lawn were in full agreement with the little baskets: It’s definitely spring.

5-2014-2-canon 1453-2014-2-canon 148 4-2014-2-canon 1448-2014-2-canon 152-0031-2014-2-canon 142 2-2014-2-canon 1841-2014-2-canon 1863-2014-2-canon 1835-2014-2-canon 181

fabric yarn basket

Chunky Gray Basket With Trim

I had this broad-band gray knit strand.
It wasn’t quite as soft and cottony as t-shirt yarn, so I thought this was a good chance to make a biggish and firm rug. Or basket. Or rug. I started single-crocheting around in a spiral with my no. 15 hook, stretching out the loops at the end of each stitch to make sure it didn’t round in and I could postpone the decision of whether it would be a rug or a basket until… That was it, and it was time to go up now – or forever be flat on the ground. I went up, and crocheted around the edges until the fab-yarn* ran out. Luckily the sides were just tall enough to keep a something in the basket.
2014-2-canon 224 1 edI then pulled out the pink strand with black polka dots. It was just right for the trim, which I made in the reverse single crochet stitch (rsc). There was enough left for a cute bow tie. I know it’s a little too much but I couldn’t resist it… Pink polka dotted yarn has a certain effect on me.
2014-2-canon 239 1 edBy now I’d decided the something in the basket would be pomegranates.
I started with two beautiful ceramic pomegranates (made by Ayelet, like all the beautiful ceramic art in my photos). One of the pomegranates has a dusty pink shade that reflected the pink strand nicely.
2014-2-canon 224 edPomegranates are in season here and they are a symbolic fruit for the coming Jewish New Year, too.
The two ceramic treasures were joined by some real ones.
2014-2-canon 238 1 ed

Can you tell them apart?

2014-2-canon 242 1 edIf only the new year could be as sweet as pomegranates!
Just a thought: Have you ever considered the fact that seeding a pomegranate has much the same appeal as crocheting? As the little chunks of bright color gather at your fingertips, they make you want to keep at this pleasant task by sending some secret signal to our hunter-gatherer brain that says, “keep gathering those little berries… Roots… Seeds… Soon your family will be fed and you will be happy.”
The pomegranates are delicious (the edible ones). 2014-2-canon 244 1 ed

*Fab-yarn is a term I invented, it’s short for fabric yarn, and if it hasn’t been invented before, I get cheers and claps – but only if it catches. I’ll Google it in a few weeks (or years?) and we’ll see if it’s out there!

black fabric yarn handbag

Little Black Bag

The place where I buy fabric yarn had black on sale. I’m not big on black for home décor, but it occurred to me that I do need a new handbag. Badly.2014-2-canon 245After some crocheting and un-crocheting I figured out the problem with fabric-yarn bags: They can be very weighty. I realized the bag I was trying to make would outweigh my present sack before I ever put anything in it. I decided to try the unlikely approach: Instead of going for dainty and delicate as I had done, which resulted in a tightly-textured, sturdy but very heavy tote, I would go for loose and large – more air, less weight. Out came my no.15 rag-rug hook.

2014-2-canon 243I made a small oval base starting with 9 stitches using the chainless foundation method (link below if you’re not familiar with it).  For the second row of the base, I used single crochet worked into the back loop (I’m using American crochet terms here).  I increased as necessary at the ends to create the half-rounds of the oval (for more details on the oval base, roll on down).  From then on I just went straight up with the woven stitch (no more increases at ends of rows). The woven stitch is a really cool stitch because it is so simple and yet the texture really looks like checked or woven fabric.2014-2-canon 231It’s made by working 1 single crochet, then one chain, and skipping a stitch in the previous row, and so on; In the next row, you alternate and work the single crochet into the gap where you skipped in the previous row, then chain one and skip. Besides the cool checked effect, you get texture that is strong but not dense, and while there are skips and gaps, what you see – and get – is pretty solid, no visible holes, no functional gaps for things to fall through. So with the big hook, and all that air worked in – you get a bag that is light and yet tight.

Crochet diy fabric yarn bag

Little Black Bag

The body of the bag was worked in a spiral. Of course you don’t really see a spiral; When you finish the oval base, you just continue working into the last row of of the base with the woven stitch. When you finish the first row of the woven stitch you don’t slip stitch and chain two etc., instead you continue working into the first stitch of the first row and on from there. No stop signs, no traffic lights, just crochet on and on until you reach the desired height. I made 15 rows for the body of the bag. Just one thing: Finish the last round at the side edge of the bag so you don’t see a jump in height, and use an invisible join after the last sc you make. This will happen after you attach the rings.

2014-2-canon 235The rings: While working the last row, I attached the rings (wooden curtain-rod rings). Here’s how: After completing the first sc stitch from the side of the bag, you push the hook into the ring and draw the yarn from where it was, and complete a chain stitch with the ring inside it. Skip one stitch on the row below and insert the hook for the next sc as you normally would, keeping it tight to help fasten the ring securely. Complete the single crochet: Ring attached. As you near the end of the row, attach the second ring in the same way starting one before the last stitch, so it is the same distance from the edge. Do the same on the back side of the bag, for 4 rings in all, making sure they are aligned and in equal distance from the edges.

2014-2-canon 240So, where did I get that cord? I had a stash of goodies given to me by a loving family member. In our family, stashing Useful Things That Can Be Made Into Something crosses generations, and sometimes, so do the stashes themselves. I think it must have been a belt for a dress somewhere in the seventies. It’s strong enough to carry the weight of the bag, but soft enough to distribute it comfortably.  I should say, the bag is not very big and not intended for carrying very heavy things. I tested it with a water bottle, a phone and sunglasses and it worked.

2014-2-canon 249So it’s probably more of an evening bag by me, and replacing my potato-sack day bag will have to wait till I find/make something bigger
Notice the bag is worked in a continuum, which is what the spiral does, so there is no stitching, no matching, no stopping and going, one piece to crochet, and one piece visually – a small item that has one basic pattern (besides the base) which makes it neat and smart, creating a kind of contrast with the true nature of fabric yarn, which is soft, rustic and uneven. That true nature is still there but kind of in hiding, which is what makes it cool.
It’s almost autumn so I took some pictures with a mug of tea and a couple outside under the oak tree with some romantic and very authentic autumn leaves.  The pretty mug was made by Ayelet.
2014-2-canon 2512014-2-canon 2372014-2-canon 236

How I made the oval base:  So, the inside of the oval base is the foundation row which already has sc (single crochet) worked into the chain, and you work sc on the other side as well. I made the necessary increases to create the half-rounds at both ends of the foundation chain.  How to increase at the ends of the base to create the oval: When you’ve completed the 9 stitches of the chainless foundation as below, *sc again into the last chain, chain 1, sc crochet again*, then start working the other side of the foundation chain.
When you reach the other end, repeat from *.
Slip stitch into the next stitch (which is the first sc of the foundation chain). Ch 1. *Sc into the back loop of every sc for next 8 remaining stitches. Increase for next 3 stitches to create the round*. Repeat from *. Now sc into the ch1 you made at the end of the previous row, and continue with the woven stitch in a spiral from there.  So the first row of the woven stitch is worked into the last row of the base, and note that since it is a woven stitch it is done the normal way, not into the back loop.

The chainless foundation: : http://makezine.com/craft/how-to-chainless-foundation-for-single-crochet/

Save

spiral fabric yarn trivets

Spiral Trivets

This was a fun little project inspired by a design from Brazilian crochet artist Helena Maria Caldas of http://helenacc.blogspot.co.il/

I love Helena’s colorful and cheerful designs. These trivets are made by crocheting half-double crochets in a spiral, then slip-stitching around from the middle in an accent color. When you get to the edge, you switch to double crochet. It sounds simple – and it is! But Helena’s designs always have that little magic something to them – in this case, notice how the slip stitch accents the spiral pattern, but at the same time fills in the gaps between the stitches to create a firmer fabric. The slip stitches cover a bit of the stitch, making it shorter, but when you switch to double crochet, more of the stitch is exposed. The result is an organic-like increase in stitch height as you reach the outer row.

httpsflic.krp69YNnC

Since I don’t understand Portuguese, it took me a bit to figure out how this was made.  I made the purple-and-yellow one first, trying and retrying until I figured out that little bit with the stitch height… And when I got it, I just had to make another one!

trivets 1

In case you don’t speak Portuguese either: It says on Helena’s blog that you can hang them in your kitchen as decor, and if you make them from thinner strands of yarn, you can use them as pot-holders too (assuming I got what Helena meant, with a little Spanish to help me out).  These are made from pretty thick fabric yarn, so they won’t work as pot-holders but I already checked and they are good for keeping the pot warm and the table safe.

One note: Make sure you have high cotton fiber content in your “yarn” – you don’t want synthetics coming in contact with a hot pot base!

Conch photo credit:  https://flic.kr/p/69YNnC