Tag Archives: fabric yarn

crochet fabric yarn rug

Candy Carpet and Blogiversary

It seems appropriate at the close of a year to come full circle to one of my first fab-yarn (my term for fabric yarn) projects. Fortunately I took the pictures some time ago, because by now it has already undergone some wear! But before I tell you about it, I want to go back to August, 2014, when I first started writing here…
I was crocheting incessantly at the time because it was all I could do in face of a raging war where I live. I was hanging on to the threads of fabric yarn for balance, and they became threads of hope and prayer to me. Not much in the way of combating evil but on a personal level, it was panacea.
That round of hostility is over, but it seems as if the ongoing conflict has splintered into anger and cruelty and hatred. Summer, with its crazy heat and humidity, has apparently instigated flames in sad and frightening ways.
I have learned that stitching gives me some inner peace in times of turmoil, whether regional or very personal. I thank you for joining me in this peaceful abode, and welcome your company in the Pursuit of Simple Joys.

Crochet rag rug

So this is the rug, titled Candy Carpet for the candy-cane striped strand midway, and the general crazy color scheme. It was a by-product of my First Project, because the same day I raided my closet for old t-shirts and tights, I realized that not all old clothes necessarily go well with each other. The pink-red-purple-turquoise pattern of the old tights in the middle simply did not blend well with the brown-green checks of the old flannel shirt.

Crochet Rag Rug
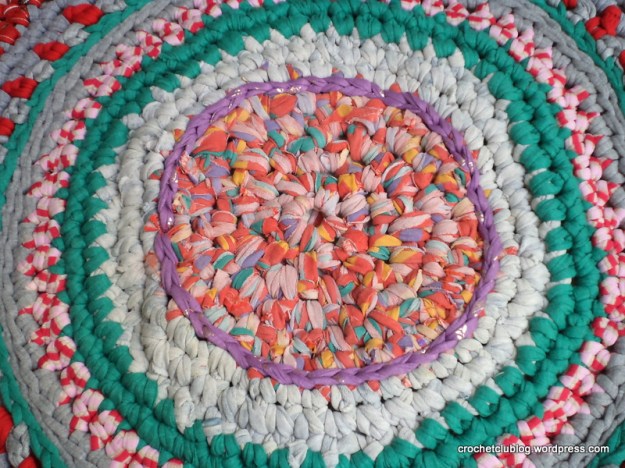
And so my first rug became two rugs – I started them both alongside, then went to the fab-yarn shop and bought what I needed to match each of them. Having started with crazy colors I went along, and this was also a chance to feature one of my favorite ever strands – see the red floral cotton between the pink and the gray? This home cut strand, originally a curtain hem, was a gift from my MIL who was glad to donate her stash in support of my newfound creative endeavor.  I think we’re giving “vintage” a new meaning here.

Crochet rag rug
Like my first first-rug, this project was done in happy obliviousness of rules and conventions. All I knew was “intuitive” crocheting, as in, adding enough stitches to make it settle nice and flat. I think it worked for the most part, and when it didn’t, I un-crocheted it, and tried and erred till I was happy with the result. The same with the colors and pattern – I stitched around, then unraveled it if I didn’t like it… So in all, if I had crocheted forward and not back-and-forth, this rug could probably cover our living room floor. But as it is, it’s just right for a visiting toddler to settle on – and enjoy the legos that have been sitting around since my kids were resident toddlers.

Crochet Rag Rug
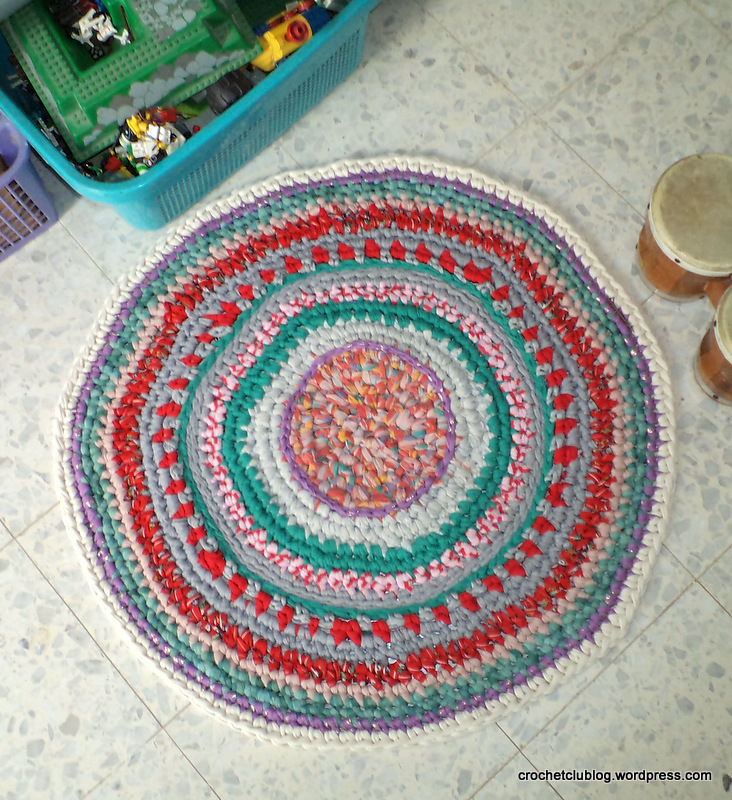
You may notice the center is a bit off-center. Like my other first carpet, I kept to the rule of – not a scrap of old scraps is to be thrown away, so I stitched until the strand ended, which was not always at the end of a row. But since the fabric pattern was so wild anyway, I just let it be, and put a little peace and order in by encircling the middle enclave in purple and gold. Some additional containment I think was obtained with the off-white border. I also think it gives it kind of an ethnic-carpet style, don’t you?
I can tell you it’s soft and comfortable to sit on, and that is the one nice thing about making rugs out of well-worn, thread-thin 20 year old cotton tights…

Advertisement
Crochet Fabric Yarn Basket for Cat Textile yarn basket t-shirt yarn plarn trapillo

A Basket for Louis

Louis needed a basket to snuggle in. His people mentioned something about it rather inadvertently (I thought I heard the word “cat”, or maybe it was “bat”? And there was something about “basket”, but it might have been “brisket”, I’m not sure). At any rate, when I offered to make Louis a basket of his very own, they didn’t object. Well, not very insistently. I knew of course they were only being polite so as not to trouble me and so I assured them I’d be delighted to make it.
I asked them what color they wanted it to be (I am so very careful not to impose my designs on my friends’ décor). They said maybe dark red. Fortunately I had some, and I thought it would go well with the gray.
Louis’s people liked the basket, and I hope Louis will too (Right now it’s high summer so Louis spends most of his time outside, stalking frogs and such). If you want to know how I made the basket, please scroll down.
The cat in the pictures is not Louis, but our cat, who always joins me whenever I’m taking pictures of my projects in the garden. In this case she seemed especially interested, and in the end I could see why. I had to re-tie the bow a few times but now it’s back to it’s original elegant form.
(For updates on Louis and his basket, and a rather regal surprise, see The Prince and the Not-Exactly-Pauper.)
Louis 5bLouis 8Louis 9Louis 3

How I made the basket: I asked Louis’s people what size they thought it should be. They measured the newspaper basket he usually settles in and said, 30cm X 40cm. Since I wanted to make an oval, I subtracted the width from the length (40 – 30 = 10) and that gives you the length of the starting chain.

Make a starting chain of 10cm (I used a size 12 hook), ch 1, then sc into the 2nd st next to the one on on your hook, and into every one after but the last.

When you reach the end stitch, make 3 sc into it. Continue with sc into each st on the other side. When you reach the end stitch, sc 2 into it, which will join the one sc you made at the start.

Continue with sc in a spiral, always adding 3 sc on the round part of each side every time you crochet along it, the same way you pick up your salary whenever you pass ‘start’ in Monopoly.

When your width is 30 cm, your length should be 40 cm.  Stop adding, and make a row of 1 sc all around. Finish it off with an invisible join and cut.  Start a new thread for the next row (mine was red), crocheting with woven stitch around the base (crochet from the outside, with the right side of the base facing upwards), and close the row with 1 sl st and 1 ch st. Continue upwards with woven stitch, closing each row with sl st and 1 ch st. Notice you are no longer crocheting in the spiral but closing with a sl st  and ch 1’ing at the end of each row.

When you reach the desired height, finish off the last row with an invisible join and cut.

Make the trim using sl st into back loops only of top row of sides, finishing off with an invisible join. Leave a tail at the beginning and end of the trim (mine was gray as you can see).

Draw the tails outside, and cut a separate piece of red strand.  Try and simulate tying a bow before it’s cut so you know how long to cut it. Now place the cut strand on the inside of the basket where the gray tails were, draw out the tails of the red strand, and tie a pretty bow on the outside.  Snip the ends to match the length of the gray tails. I tied a single knot at the ends of the gray tails because it made them hang down a little better, so if you want to do that, tie first before matching the length of the red.

Crochet fabric yarn basket

Peach and Purple

But actually, neat and sturdy stitches aren’t limited to Baskets for Guys. I had fun making these for the lovely young ladies, splurging in peachy orange, sparkly purple and pink-striped trim. I’m sounding bold but all along there was that nagging hesitation too – will the baskets fit the color scheme of their destined surroundings? Will they suit the receivers’ individual tastes, which I so admire and respect?
But if we went along with thoughts like that, there’d be no give and take, would there, to use Eeyore’s terms. And thinking of that, weren’t Pooh and Piglet a little hesitant about their own gifts too, and wasn’t Eeyore so very pleased to get them nonetheless?
And does a flower ask itself every day if its colors are just right, and if its petals are facing the exact right direction?

Bird of Paradise
So, I guess all we can do is pick up our magic wand and crochet that pumpkin – or lilac – and send them on their way!

Crochet Fabric Yarn BasketBird of ParadiseCrochet Fabric Yarn BasketCrochet Fabric Yarn Basket

The baskets are posing here with a little something in them, and in real life, there were other little somethings inside.
No problem with ribbons this time!

Crochet Fabric Yarn Basket

How I made the baskets:
Using a size 12 hook and fabric yarn, I made a round spiral base in SC. I worked the sides in yarn under single crochet, working into the back loops only of the base. I made the trim in crab stitch, or reverse single crochet. I left a tail at the beginning and end of the trim, and used it to tie the bow. That’s it!

Save

Crochet Fabric Yarn Baskets

The Gift of Baskets

In our family, guys get baskets too. I’ll have to say they were sweet about it, though! And I for my part did my best to meet the design challenge: I made a round base and finished it off, then started working the sides into the back loops of the last row of the base. Both the base and the sides were done using yarn under single crochet. What is that, you ask? Oh! (Shrugging nonchalantly…), only the coolest and most useful stitch that I’ve just recently discovered… It’s a good stitch for when you want a neat and sturdy style.  Did I mention I was making these for the guys? Crochet Fabric Yarn BasketCrochet Fabric Yarn Basket The trim was made with a complementary color, in good old-fashioned single crochet.  No ribbons and bows this time… Crochet Fabric Yarn BasketCrochet Fabric Yarn Basket The fruit is for the picture. In reality there were other things inside, and the guys, being sweet, pretended along with me that they didn’t know whatever was in them, no matter how carefully chosen and well meant, was just an excuse to give them one of my very own creations 🙂 Crochet Fabric Yarn Baskets

Crochet Fabric Yarn Basket

Spring Basket

It’s still spring in Basketland – Look what sprouted in my garden!Crochet Fabric Yarn Basket

After more spiral-crochet baskets than I can count, occupying a total area which far exceeds the sum total of surface areas in my house AND all my friends’ and relatives’ houses combined, I’ve decided it’s time to switch to… A new type of basket! My research on more sturdy sides, allowing for a slightly less roundish and more cylindrical shape, led me to the waistcoat stitch. The stitch, despite its anything-but-botanical name, actually yields a lush leaf-like texture, which totally looks like something growing from the spiral base . And so it is fitting that it should have a daisy-ish trim. I made the trim with a combination of single crochet (the white) and slip stitch (the yellow).crochet fabric yarn basket

And of course, the bow.Crochet Fabric Yarn Basket

Crochet Fabric Yarn Nesting Baskets

Baby Nesting Baskets

I chose this design for a cute little round basket with a single handle. I bought lots of balls of fabric yarn in bright colors to choose from. And while I was experimenting with the design, some came out a little bigger and some a little smaller, depending on which type of strand I used. Where I buy fabric yarn, the strands are each different, because they are made from textile factory leftovers.  I think that counts as a certain level of recycling!
Anyway, I noticed that the smaller ones fit very nicely into the bigger ones – and I had fun mixing and matching them into these duos.
Two lone but determined wildflowers springing up from the lawn were in full agreement with the little baskets: It’s definitely spring.

5-2014-2-canon 1453-2014-2-canon 148 4-2014-2-canon 1448-2014-2-canon 152-0031-2014-2-canon 142 2-2014-2-canon 1841-2014-2-canon 1863-2014-2-canon 1835-2014-2-canon 181

fabric yarn basket

Blue Basket With Flowers and Trim

Since my first two little baskets, I have crocheted so many baskets with fabric yarn, and un-crocheted even more!  Wait, that doesn’t make sense… But that’s how it seems.  Fabric yarn is so quick and easy to unravel, that whenever I don’t like the outcome I just pull and undo it, and remake it a little better… Or maybe change the type and color of the trim.
But if I get past the immediate urge to unravel the imperfect, or if by chance it comes out perfect, I place the finished basket somewhere ‘just for now’, and something strange begins to happen… The fabric yarn I just finished crocheting sends off little rootlets into the table or the shelf… The roots grow into the surface, deepening their hold (they do this especially at night), and when I want to move the basket, I discover it’s too late, it’s impossible to detach it from where it has been standing.
There is only one way to get around this (that I know of), and that is, when you crochet the basket for someone special. There will be a lot of unraveling and redoing, but when it’s finished, the roots will wait to grow until they reach that person’s house.
So now, it’s just a matter of finding the right flowers to go with the basket.2014-2-canon 167
I have had two opportunities to make such a basket for two special someones, and it was such a nice feeling to see them growing roots in their new home. Well, I didn’t try to lift them from their place but I assume it’s the same on any surface.
IMG_20140802_172537095This picture was taken by my niece N. (we were running a little low on daylight, but I think the lighting gives it atmosphere…).

These two baskets (they are two different ones, although they look the same…) were made by single-crocheting blue fabric yarn in a spiral for the base, then continuing straight on for the sides. Once you have a low-rimmed blue bowl, you finish it off, and start to crochet the flower rows. My green and red strands were slightly thinner than the blue, so I think I may have used a slightly smaller hook. This serves well for the rounding in of the basket. You start with the stems in green: Two half double-crochets in a stitch, then skip one (you need to have an even number of stitches, which you will if you start the base with an even number of single crochets into the magic circle). For the next row, you crochet a red half double crochet into a pair of green hdc’s, right between the stems – then chain stitch, and so on all around. For the trim, you use a lacy strand of fabric yarn. You start by slip-stitching the strand to the space between two red hdc’s, then chain-stitching (I think 4 ch st), and slip-stitching again in the next space, and so on all around.
2014-2-canon 160
If you start with a tail to the thread and end with one, you can pull those tails through to the outside of the basket to make a bow, or just tie in a loose knot and let the strands hang down so their laciness shows.
2014-2-canon 161
If you put a flowerpot in the basket, be sure to use a base for it, and if you want cut flowers or a little flower arrangement, make sure it’s in a bowl!

fabric yarn rug

Growth Ring Rug

At last, my first! This was my first ever fabric yarn project. Previously on this blog, I wrote about the first project I completed, which you will note is not the same thing. The pair of little baskets were begun and finished in an afternoon, even as the rug I was working on was slowly growing its rings.  It all began with The Shirt.  It was (note the past tense…) soft checked 100% cotton flannel in shades of turquoise and brown. It was handed down and handed over several times, spanning cousins and continents, and worn to a very worn state. It was so soft and comfortable because the fabric had, over time, turned from cotton to silk (yes, that can happen with enough laundering and wear), and in some places, it was so nearly-frayed that a gentle breeze could cause it to rip.
How can anyone possibly say goodbye to a shirt like that? Impossible.  So one day, when yet another little rip overturned the balance between intact and torn threads in favor of the latter, it was time to give it its new form.
With a certain vision as to how a rag rug is made, I took my big scissors and started cutting the shirt into strips. I cut everything: Front, back, stitches, collar, cuffs. Not a check of the checked fabric was left out. I realized at some point that the buttons were probably out of the game, but everything else was cut, piled and joined to form a nice, long, faded, fuzzy, soft, cotton-silk turquoise and brown strand.
I had a big crochet hook I had used as a teenager to make really quick shawls out of regular yarn. For many years I thought that’s what this jumbo hook was for – emergency gifts – until I realized the true purpose of this timeless tool.
I have many a crocheted spiral in my résumé, but it was weird – and fun – and funny – to be crocheting a torn up shirt. The strand of joined yarn was a little uncooperative at times – especially when I got to the cuff and collar parts – but I finally managed to get it all under my hook. And before long – in fact, quite sooner than I expected – the strand was all gone, and the “rug” was a little over the size of a dinner plate. This, from a shirt that had crossed continents and generations and withstood not only gentle breezes but many a northern gale: A tiny, scrunched up dinner-plate of a ruglet with some cuff and collar sizing sticking out here and there.
But there was no going back – a shirt, it could no longer be (and really hadn’t been for quite a while, in the usual sense of the word). As I could not go back I thought I’d move on and find some more Old Shirts to add to the rug.
Old clothes are not that hard to come by in our house, due to my tendency to move them to The Back of the Closet rather than Out of the House. I found two very soft and comfortable stretchy tops that had seen better times, and an old black cotton t-shirt – well, ex-black, now faded charcoal, to be precise.  All three garments were retrieved from the depths of the closet and promptly cut and joined to form 3 colored strands.
Unspoiled as I was at the time by Facebook groups, blogs, patterns and other showcases of the Current Conventions of the art of fabric yarn, I had no qualms about crocheting each strand as it went, until it ran out, the traditional way. But instead of starting a new color in the middle of a row, towards the end of each strand I switched from single crochet (American term) to slip stitching, sloping along the round gradually to close it into a circular form. The result was four not-too-concentric circles that look like – well, puddles, or lakes, or, as I finally decided, the growth rings of some mysterious tree.
Growth rings in a 55 year old pine slice

Crochet Rag Rug Ok, I know how to crochet perfect circles, or a spiral as I choose. But it was my choice to use up every single itty-bitty strand from these much-worn, much-faded, faithful clothes with so many a story to tell, and it felt like these circlish forms would best tell their story.
But even these soon ran out… And so I made my way to actually buying pre-cut strands – what a funny thought, for someone to purposely create rags! But there was no going back… My hook was poised and the rug was waiting. The bought strands joined the historic ones, completing the organic woodsy color scheme and also the very free-flowing stitch choice and style.
Crochet Rag Rug
The rug has found its place in the bedroom, far from the scrutiny of strangers who might choose to enlighten me on the basics of Euclidean geometry, but viewed daily by those who understand the true meaning of every growth ring. Sometimes when I open my eyes in the morning I can swear it’s started growing another ring overnight – could this be possible?

Crochet Rag Rug

fabric yarn basket

Chunky Gray Basket With Trim

I had this broad-band gray knit strand.
It wasn’t quite as soft and cottony as t-shirt yarn, so I thought this was a good chance to make a biggish and firm rug. Or basket. Or rug. I started single-crocheting around in a spiral with my no. 15 hook, stretching out the loops at the end of each stitch to make sure it didn’t round in and I could postpone the decision of whether it would be a rug or a basket until… That was it, and it was time to go up now – or forever be flat on the ground. I went up, and crocheted around the edges until the fab-yarn* ran out. Luckily the sides were just tall enough to keep a something in the basket.
2014-2-canon 224 1 edI then pulled out the pink strand with black polka dots. It was just right for the trim, which I made in the reverse single crochet stitch (rsc). There was enough left for a cute bow tie. I know it’s a little too much but I couldn’t resist it… Pink polka dotted yarn has a certain effect on me.
2014-2-canon 239 1 edBy now I’d decided the something in the basket would be pomegranates.
I started with two beautiful ceramic pomegranates (made by Ayelet, like all the beautiful ceramic art in my photos). One of the pomegranates has a dusty pink shade that reflected the pink strand nicely.
2014-2-canon 224 edPomegranates are in season here and they are a symbolic fruit for the coming Jewish New Year, too.
The two ceramic treasures were joined by some real ones.
2014-2-canon 238 1 ed

Can you tell them apart?

2014-2-canon 242 1 edIf only the new year could be as sweet as pomegranates!
Just a thought: Have you ever considered the fact that seeding a pomegranate has much the same appeal as crocheting? As the little chunks of bright color gather at your fingertips, they make you want to keep at this pleasant task by sending some secret signal to our hunter-gatherer brain that says, “keep gathering those little berries… Roots… Seeds… Soon your family will be fed and you will be happy.”
The pomegranates are delicious (the edible ones). 2014-2-canon 244 1 ed

*Fab-yarn is a term I invented, it’s short for fabric yarn, and if it hasn’t been invented before, I get cheers and claps – but only if it catches. I’ll Google it in a few weeks (or years?) and we’ll see if it’s out there!

black fabric yarn handbag

Little Black Bag

The place where I buy fabric yarn had black on sale. I’m not big on black for home décor, but it occurred to me that I do need a new handbag. Badly.2014-2-canon 245After some crocheting and un-crocheting I figured out the problem with fabric-yarn bags: They can be very weighty. I realized the bag I was trying to make would outweigh my present sack before I ever put anything in it. I decided to try the unlikely approach: Instead of going for dainty and delicate as I had done, which resulted in a tightly-textured, sturdy but very heavy tote, I would go for loose and large – more air, less weight. Out came my no.15 rag-rug hook.

2014-2-canon 243I made a small oval base starting with 9 stitches using the chainless foundation method (link below if you’re not familiar with it).  For the second row of the base, I used single crochet worked into the back loop (I’m using American crochet terms here).  I increased as necessary at the ends to create the half-rounds of the oval (for more details on the oval base, roll on down).  From then on I just went straight up with the woven stitch (no more increases at ends of rows). The woven stitch is a really cool stitch because it is so simple and yet the texture really looks like checked or woven fabric.2014-2-canon 231It’s made by working 1 single crochet, then one chain, and skipping a stitch in the previous row, and so on; In the next row, you alternate and work the single crochet into the gap where you skipped in the previous row, then chain one and skip. Besides the cool checked effect, you get texture that is strong but not dense, and while there are skips and gaps, what you see – and get – is pretty solid, no visible holes, no functional gaps for things to fall through. So with the big hook, and all that air worked in – you get a bag that is light and yet tight.

Crochet diy fabric yarn bag

Little Black Bag

The body of the bag was worked in a spiral. Of course you don’t really see a spiral; When you finish the oval base, you just continue working into the last row of of the base with the woven stitch. When you finish the first row of the woven stitch you don’t slip stitch and chain two etc., instead you continue working into the first stitch of the first row and on from there. No stop signs, no traffic lights, just crochet on and on until you reach the desired height. I made 15 rows for the body of the bag. Just one thing: Finish the last round at the side edge of the bag so you don’t see a jump in height, and use an invisible join after the last sc you make. This will happen after you attach the rings.

2014-2-canon 235The rings: While working the last row, I attached the rings (wooden curtain-rod rings). Here’s how: After completing the first sc stitch from the side of the bag, you push the hook into the ring and draw the yarn from where it was, and complete a chain stitch with the ring inside it. Skip one stitch on the row below and insert the hook for the next sc as you normally would, keeping it tight to help fasten the ring securely. Complete the single crochet: Ring attached. As you near the end of the row, attach the second ring in the same way starting one before the last stitch, so it is the same distance from the edge. Do the same on the back side of the bag, for 4 rings in all, making sure they are aligned and in equal distance from the edges.

2014-2-canon 240So, where did I get that cord? I had a stash of goodies given to me by a loving family member. In our family, stashing Useful Things That Can Be Made Into Something crosses generations, and sometimes, so do the stashes themselves. I think it must have been a belt for a dress somewhere in the seventies. It’s strong enough to carry the weight of the bag, but soft enough to distribute it comfortably.  I should say, the bag is not very big and not intended for carrying very heavy things. I tested it with a water bottle, a phone and sunglasses and it worked.

2014-2-canon 249So it’s probably more of an evening bag by me, and replacing my potato-sack day bag will have to wait till I find/make something bigger
Notice the bag is worked in a continuum, which is what the spiral does, so there is no stitching, no matching, no stopping and going, one piece to crochet, and one piece visually – a small item that has one basic pattern (besides the base) which makes it neat and smart, creating a kind of contrast with the true nature of fabric yarn, which is soft, rustic and uneven. That true nature is still there but kind of in hiding, which is what makes it cool.
It’s almost autumn so I took some pictures with a mug of tea and a couple outside under the oak tree with some romantic and very authentic autumn leaves.  The pretty mug was made by Ayelet.
2014-2-canon 2512014-2-canon 2372014-2-canon 236

How I made the oval base:  So, the inside of the oval base is the foundation row which already has sc (single crochet) worked into the chain, and you work sc on the other side as well. I made the necessary increases to create the half-rounds at both ends of the foundation chain.  How to increase at the ends of the base to create the oval: When you’ve completed the 9 stitches of the chainless foundation as below, *sc again into the last chain, chain 1, sc crochet again*, then start working the other side of the foundation chain.
When you reach the other end, repeat from *.
Slip stitch into the next stitch (which is the first sc of the foundation chain). Ch 1. *Sc into the back loop of every sc for next 8 remaining stitches. Increase for next 3 stitches to create the round*. Repeat from *. Now sc into the ch1 you made at the end of the previous row, and continue with the woven stitch in a spiral from there.  So the first row of the woven stitch is worked into the last row of the base, and note that since it is a woven stitch it is done the normal way, not into the back loop.

The chainless foundation: : http://makezine.com/craft/how-to-chainless-foundation-for-single-crochet/

Save